
Last Updated on October 18, 2023 by Pro Handyman Australia – Editorial Team
Woodworking is an exhilarating venture, especially for those just dipping their toes into this vast craft. While the world of woodworking may initially seem overwhelming, with the right guidance, mastering the basics becomes an achievable goal.
Our dedicated community, along with our seasoned editors, is always eager to share their wealth of experience. Drawing from their collective insights, new woodworking enthusiasts can quickly gather the essential tips and tricks to navigate this creative domain with confidence and finesse.
Essentials of Woodworking: Tips and Tricks for Every Woodworker

Protecting Your Craft: The Bar Clamp Cover
Iron pipe clamps can inadvertently damage softer woods or cause staining due to reactions with wood glue. To counteract this, one effective strategy is to encase the pipe in a section of plastic PVC pipe cut to size. If working with varying widths of stock wood, using multiple short lengths spaced aptly can be beneficial.
Achieving Precision: The Blade-Height Gauge
A gauge block is a tool designed to set the height of a table saw blade promptly. A common variant is made from a 3-inch section of 4×4, cut to the most frequently used settings. If more settings are required, simply craft additional blocks. These blocks are invaluable when you need to adjust your table saw blade.
Mastering the Art of Jointing
Jointing stands as a fundamental step in wood milling, primarily focusing on the creation of a flat surface on one face and one edge of the wood piece. This technique is essential for ensuring that subsequent cuts are accurate and that the pieces fit together as needed in the final construction. While its main purpose is for flattening, a jointer has versatility, occasionally serving additional functions such as creating rabbets, crafting bevels, or executing precise tapers, each contributing to the wood piece’s unique shape and fit.
The Precision of Planing
Planing follows jointing in the woodworking process, refining the wood by smoothing the surface and removing any excess material. After the jointer has been used to flatten one face, the planer comes into play to bring the wood to a uniform thickness, enhancing the material’s consistency and quality.
The choice between hand planing and using an electric planer hinges on the specifics of your project. Hand planes, though manual, offer quiet operation and unparalleled control for intricate detailing, all while keeping the workshop relatively dust-free. On the other hand, electric planers are the go-to tool for efficiently stripping away larger quantities of material, speeding up the preparation process significantly.
Meticulous Wood Milling
Milling is a transformative stage in woodworking, turning rough, raw lumber into pieces of precise geometric integrity, ready for fine craftsmanship. This process is initiated at the jointer, tasked with creating a flat face on the board. The journey then leads to the planer to ensure the board’s opposite face is equally smooth and flat.
The final step resides with the table saw, which you will use to cut or “rip” the board, ensuring the remaining edge is perfectly parallel to its flattened counterpart. This systematic approach is not just about shaping the wood but is an essential preparatory phase for the critical task of joinery, setting the stage for the creation of seamless and professional-grade products.
Demystifying Nominal Dimensions
Many are taken aback upon realizing that a 2×4 board is not actually 2 inches by 4 inches. This seeming discrepancy arises from the board being planed to eliminate any unevenness. Historically, 2x4s were indeed 2 inches by 4 inches, but their coarse surfaces made them cumbersome to stock and handle. Hence, terms like 2×4 remain as nominal sizes due to tradition and ease of use.
Curved Craftsmanship: Sanding Block from the Office
Sanding curves can be a challenging endeavor. A combination of firmness and flexibility is often required. A viable solution is using a small notepad. By wrapping sandpaper around the pad and adjusting its curvature, it becomes an adaptable sanding tool. Keeping one end of the sandpaper tucked between pages ensures it stays in place.
Precision Drawing: The Circle Layout Tool
Creating circles with accuracy is a breeze with this straightforward jig. Begin by drilling a 1/8-inch hole through every inch mark on a ruler or yardstick. For drawing a circle, use the number “1” as the center. Adjust the pencil position according to the desired radius, using the pin as a pivot, and rotate the pencil to mark out the circle.
Efficiency in Mixing: Quick Mixing Surface
When mixing epoxies or wood glues, instead of a container, consider creating a mixing area on your workbench using painters tape. This ensures no residue on your bench and facilitates easy cleanup.
Economical Staining: The Stain Sprayer Method
Staining intricate objects like chairs or lattice can be daunting. An innovative approach is to use an empty spray bottle filled with stain. This method ensures that even the tightest corners receive an even coat, which can then be wiped for consistency.
Securing Your Work: The Miter Joint Clamp
Holding four mitered corners together can be a challenge. While there are specialty clamps available, creating your own is a viable option. Using a long 1×4, angle the cuts for safety and drill a 1-inch hole in the center of each block to prevent gluing the blocks to your project.
Maintaining Your Tools: Table Saw Care
For prolonged life and efficient usage of a cast-iron table saw top, it’s crucial to understand not just how to clean a table saw blade, but also to remember the importance of periodic applications of paste wax. This practice not only facilitates smoother material feeding but also guards against issues like glue drips and humidity-induced rust, ensuring your entire setup remains in prime working condition.
Measuring Made Simple: Odd-Width Measuring Technique

Dividing irregular dimensions into equal parts can be tricky. A solution is to angle the measuring tape across the piece until an easily divisible dimension is achieved, and then marking accordingly.
Safety First: Cutting Small Parts
While cutting small, irregular objects, safety is paramount. An effective strategy is to attach each piece to a scrap 2×2 using a dowel screw, ensuring stability and safety during the cutting process.
Crafting Angles: The Improvised T-Bevel
When making angled wooden components, using steel joining plates as a template can be a game-changer. Once the desired angle is set and secured, it can be used to mark and cut multiple pieces with precision.
Adaptable Workspace: Bi-Fold Workbench
Temporary workbenches made from old doors are spacious but cumbersome. A more portable and space-saving option is using bi-fold doors with hinges, ensuring easy transport and storage.
Understanding Wood: The Intricacies of Quarter-Sawn Lumber
Quarter-sawn lumber is characterized by its growth rings running perpendicular to the board’s face. Not only are these boards less likely to shrink, but certain types, like white oak, can also display beautiful patterns. Due to their stability and aesthetic appeal, they are often sought after by woodworkers, which might result in a higher price point.
Protecting Wood with a Clamp Cover
Iron pipe clamps, while effective, have the potential to damage softer woods or interact with adhesives, causing discoloration on the wood. A prudent approach is to tailor a section of plastic PVC pipe to fit around the clamp. For those possessing multiple short sections, spacing them judiciously can cater to diverse wood stock widths.
Setting Blade Height with Precision
Achieve exact blade height on a table saw with a gauge block crafted from a 3-inch length of 4×4, aligned to the most commonly used settings. To diversify the settings, it’s easy to fashion additional blocks. These tools streamline the process of adjusting the blade, ensuring efficiency and precision.
Decoding Nominal Dimensions in Lumber
It might be surprising for many to realize that a 2×4 board is, in actuality, 1.5 inches x 3.5 inches. This discrepancy is due to the board being planed down to rid it of inconsistencies. Historically, 2x4s were genuinely 2 inches x 4 inches in size. However, their coarse texture posed stocking and handling challenges. Despite these changes, traditional nomenclatures such as 2×4 remain in use and are referred to as the board’s “nominal” size, a nod to simplicity and tradition.
Fundamentals of Sawing in Woodworking
Sawing marks the inception of most woodworking endeavors, involving the use of various saws, each tailored for specific tasks. The paramount rule during this potentially hazardous activity is maintaining safety: always don protective gear like safety glasses, a respirator mask to avoid inhaling fine particles, and hearing protection to mitigate noise from heavy machinery. Ensure a distraction-free environment and stay mentally present when operating tools, guaranteeing efficiency and safety.
Understanding the Chop Saw Dynamics
Predominantly utilized for converting lumber into more manageable sizes, the sliding compound miter saw, or chop saw, simplifies the initial stages of wood processing. While it’s also capable of executing angled cuts, its precision is somewhat limited compared to the finesse a table saw’s jig offers.
The Versatility of Hand Saws
Hand saws, devoid of the need for power, offer portability and come in an array of forms to suit various tasks. Traditional Western saws, robust and weighty, require a push motion and significant force. In contrast, their Japanese counterparts operate via pulling, boasting a slender blade and promising an easier, more refined cutting experience.
Efficiency of Portable Circular Saws
For swift, efficient cuts, the portable circular saw is the go-to tool. It combines the convenience of portability with the power to perform quick, rough cuts, necessary at the outset of many projects.
Precision Work with the Table Saw
Occupying a central position in most woodshops, the table saw is renowned for its power, accuracy, and versatility. It’s indispensable for making precise cuts, both crosscuts and rips, and its functionality expands with various jigs and blades. However, caution around the table saw is non-negotiable, as the risk of kickback—where wood can recoil towards the user—poses a significant safety threat.
Harnessing the Power of Chainsaws
Chainsaws, operating on gas, electricity, or battery, excel in executing preliminary rough cuts or in harvesting wood directly from the source by felling or trimming trees. Their portability makes them integral to fieldwork.
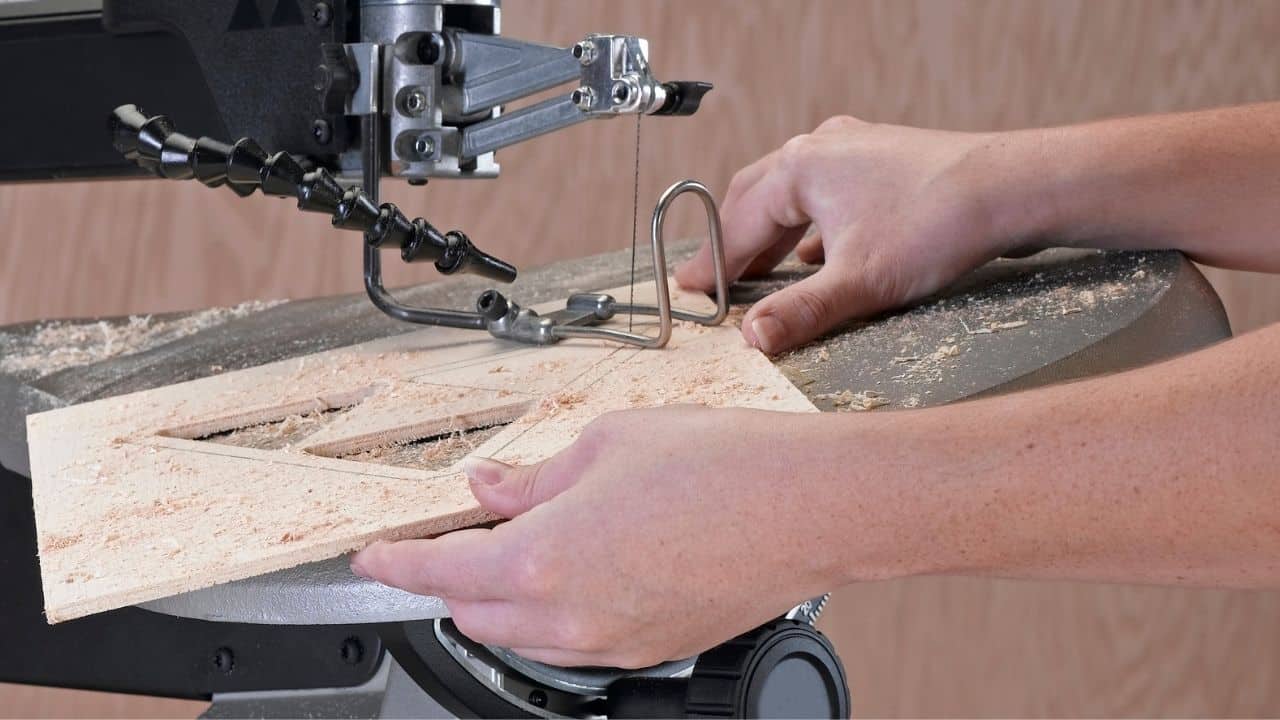
Intricacies with the Bandsaw
Ideal for rough ripping, crafting curves, or intricate ‘stopped’ cuts, the bandsaw is a versatile addition to the woodshop. While its cuts may lack the finesse of those made by a table saw, its versatility shines through for resawing tasks or when working with varying stock sizes and project complexities.
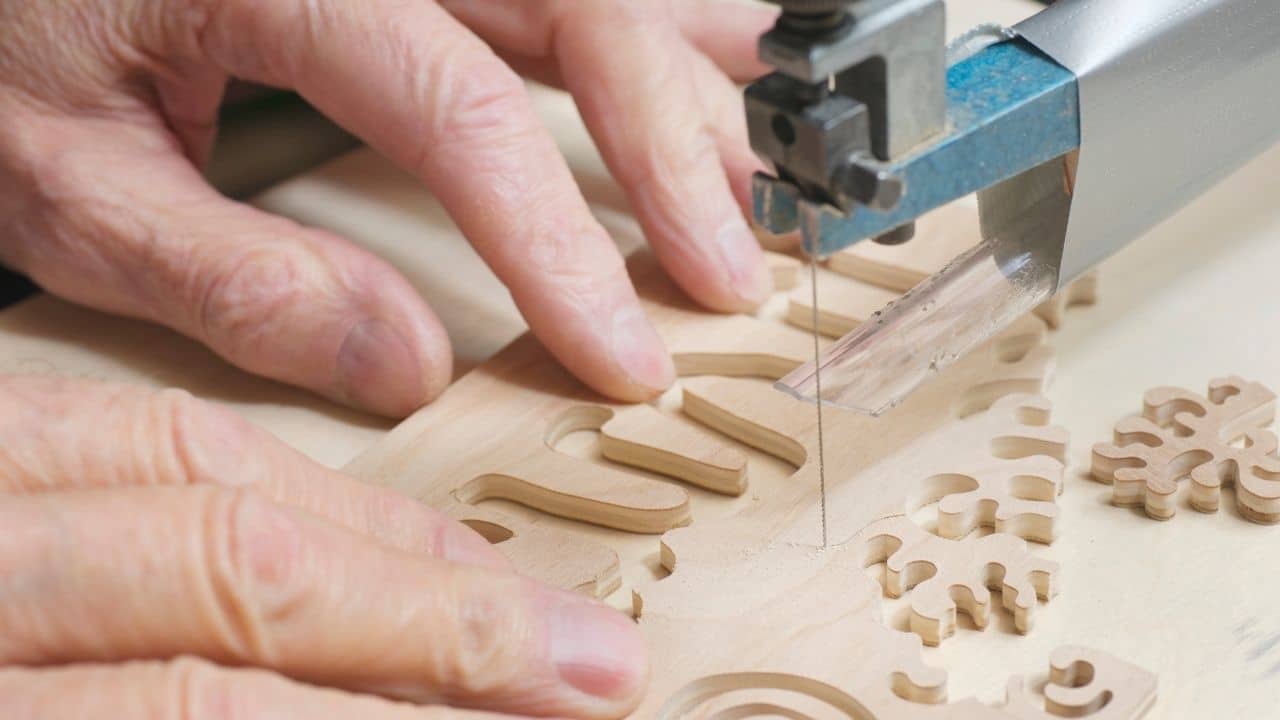
Detailing with a Scroll Saw
For artisans concerned with minute details and intricate patterns, the scroll saw is an invaluable asset. Its fine blade and precise up-and-down motion facilitate the creation of delicate curves and intricate designs, elevating the quality of the finished product.
Mastering the Art of Routing in Woodworking
Routers, celebrated for their versatility, are power tools you can operate handheld or secured to a router table. These tools excel in various woodworking tasks depending on the router bit you install. From elegant edge finishing, carving intricate grooves, to tracing exact patterns, a router is instrumental. Although it comes with a considerable price tag, its multifunctionality justifies the investment, especially for those curating tools for compact woodworking spaces or beginners establishing their workshops.

The Science of Gluing and Clamping
When it comes to uniting two pieces of wood, the adhesive used can make all the difference, transforming a fragile bond into an inseparable joint even stronger than the wood itself. Understanding the specific types of glue and their applications is fundamental to successful woodworking.
Deciphering the Best Glue Types for Woodworking
- Interior Glue (White and Yellow): This variant is prevalent in woodworking due to its strong bonding properties. However, lacking water resistance, it’s ill-suited for outdoor furnishings or any wooden construct exposed to moisture.
- Exterior Glue: As the go-to adhesive for outdoor woodworking projects, exterior glue boasts water-resistant traits, ensuring the longevity of pieces subjected to environmental elements.
- Epoxy: Beyond merely adhering surfaces, epoxy serves a dual purpose, filling discrepancies in wood fittings and significantly reinforcing the overall stability of the construction.
Clamping: Securing Woodwork During the Bonding Process
Clamping is a critical stage in woodworking, directly influencing the strength and quality of the final piece. Each clamp type serves a unique purpose, tailored to different project sizes and requirements.
- Bar Clamps: These are indispensable for larger woodworking projects, utilizing a flat bar accompanied by an adjustable jaw, dictating the clamp’s span and capacity. Their versatility is reflected in the variety of sizes and weights available, catering to diverse project dimensions.
- Pipe Clamps: Functionally akin to bar clamps, pipe clamps are ideal for expansive constructs like doors or tabletops. Their unique advantage lies in the customizable length, achieved by altering the pipe segment between fittings, accommodating virtually any project scale.
- F-clamps: For more confined work or rapid edge clamping, F-clamps are the preferred accessory. Their design even permits them to substitute for a vise, fastening workpieces to your bench, facilitating hands-free operations.
- Spring-loaded Clamps: These clamps are the epitome of convenience for smaller endeavors, with a capacity extending to around three inches. They are appreciated for their lightweight structure and user-friendly application, making them a staple in woodworking arsenals.
Achieving Curved Sanding with a Notepad

Sanding curves is an intricate task, often requiring a balance between rigidity and flexibility in a sanding pad. An unconventional yet effective tool is a small notepad. When sandpaper is wrapped around it, the notepad can be molded to fit any desired arc. Inserting one end of the sandpaper between the pages ensures it remains in place, making it a practical tool for projects with challenging curves.
Effortless Circle Layout with a Modified Ruler
Laying out circles is made effortless with this straightforward jig. By drilling a 1/8-inch hole at every inch on a ruler or yardstick, one can draw perfect circles. Position a pin in the number “1” hole at your board’s center. Depending on the desired circle radius, adjust the pencil’s position accordingly, using the pin as a pivot to sketch the circle.
Clean Mixing Surfaces for Adhesives
For minor epoxy mixtures, consider creating a temporary mixing surface on your workbench using painter’s tape. Overlap the tape’s edges, ensuring the workbench remains free of epoxy. Once done, the tape can be easily discarded. This method is versatile, accommodating wood glues and other similar materials.
Innovative Staining with a Spray Bottle
Staining intricate objects with numerous nooks can be challenging. An ingenious solution is to use an empty spray bottle filled with the stain. Spraying ensures the stain reaches even the most inaccessible areas, which can then be evenly spread using a brush or rag.
Custom Miter Joint Clamps
When faced with the challenge of clamping four mitered corners, while specialty clamps are available, creating a bespoke one can be both cost-effective and efficient. Utilize a long 1×4 for safety and ease during angled cuts. After marking the blocks, drill a 1-inch hole in the center of each. This hole ensures the blocks remain unglued to the project. Subsequent 45-degree cuts free the blocks from the main board.
Maintaining Table Saw Tops
For those aiming to prolong the life and quality of their cast-iron table saw top, occasional applications of paste wax are recommended. Not only does this provide a smooth surface, enhancing material feeding, but it also ensures glue doesn’t adhere and protects against humidity-induced rust.
Simplified Measurements for Odd Widths
Dividing odd dimensions, like 11-3/8-inch, equally can be cumbersome. A simple workaround involves angling the measuring tape on the workpiece until an easily divisible measurement is visible. Mark the desired divisions with the tape still angled, ensuring accuracy without intricate calculations.
Ensuring Safety during Precision Cuts
During a recent project involving the cutting of small, irregularly shaped furniture legs, safety was paramount. The solution involved attaching each leg to a 2×2 scrap using a dowel screw. This ensured stability during the cut and maintained a safe distance from the blade.
Creating a Makeshift T-Bevel
In the absence of a traditional tool for angled wood cuts, steel joining plates can be repurposed. After setting the desired angle, use the plate as a template, ensuring consistent angles across multiple pieces.
Space-Efficient Bi-fold Workbench
While old doors on sawhorses serve as effective makeshift workbenches, their storage can be cumbersome. Bi-fold doors, equipped with hinges, are an excellent alternative, offering space efficiency and portability for off-site tasks.
Understanding Quarter-Sawn Lumber
A board achieves the “quarter-sawn” designation when its growth rings are perpendicular to its face. Such boards are characterized by straight grains and minimal shrinkage. While this property might not be significant for basic 2x4s, it’s crucial for shelves and cabinetry where stability is desired. Notably, certain quarter-sawn boards, particularly white oak, display beautiful rays or flecks, a characteristic cherished in Craftsman.
Sanding: A Closer Look at a Crucial Finishing Technique
Sanding involves using sandpaper, characterized by varying grit sizes, to smoothen wood surfaces. It’s a meticulous process where the wood is gradually abraded with increasingly finer grits until the scratches become imperceptible. The grading of grit is determined by the number of abrasive particles per inch, making higher grades correspond to finer sandpapers.

Filing: Shaping with Precision and Care
Filing, on the other hand, is dedicated to refining wood, eliminating rough areas, and making precise adjustments in less accessible angles. The tools, typically composed of hardened steel and fitted with a wooden handle, come in forms like files and rasps, the latter being more aggressive in removing material and resulting in a rougher texture.
The Art of Hand Sanding
Hand sanding, though labor-intensive, offers unparalleled control. It’s most effective when using a sanding block, promoting an even pressure, except for when dealing with curves or beveled edges where the flexibility of sandpaper alone is advantageous. Always sand in alignment with the wood grain to minimize visible scratch marks and maintain the wood’s integrity.
Embracing the Power of Mechanical Sanding
For larger projects, powered sanders are a boon. However, their strength can be a double-edged sword, leading to inadvertent unevenness if not handled with finesse. Specific tools like disc sanders and spindle sanders are excellent for initial shaping, adept at handling flat surfaces and various curves, respectively. For the finishing phase, handheld random orbit sanders or oscillating drum sanders are more appropriate, though they demand a delicate touch to prevent unintended surface damage.
Diving into the World of Wood Finishing
Wood, while naturally robust, is prone to superficial damage and wear over time. It’s susceptible to scratches, temperature fluctuations, and moisture-related expansion or contraction. Applying a finish can significantly enhance the wood’s durability, protect its surface, and highlight its natural beauty.
Exploring Types of Wood Finishes
- Penetrating Finishes: These oil-based solutions seep into the wood, fortifying it from within while preserving its natural appearance. They are user-friendly, perfect for showcasing the inherent texture and grain of the wood.
- Surface Finishes: Contrasting with their penetrating counterparts, surface finishes form a protective shield atop the wood. Varieties include paint, polyurethane, and shellac, each providing robust defense against routine wear and tear. These finishes are particularly suited for high-traffic items and outdoor furnishings.
Expert Insight: Finishing Touches Matter
Remember, finishing isn’t solely for outward-facing surfaces. To maintain consistency, especially with changes in humidity, it’s crucial to apply the finish to concealed areas of your piece. A couple of coats should suffice for these hidden sections, ensuring uniform reaction to environmental conditions.
Finishing is an expansive domain within woodworking, replete with diverse opinions and methodologies. While this guide serves as an introduction, the journey toward mastering finishes involves exploring various products and techniques to discover what resonates with your woodworking style and meets your project’s needs.
What to Remember:

Precision in Craftsmanship: The Golden Rule
In the realm of woodworking, the adage “measure twice, cut once” holds paramount significance. This timeless piece of advice underscores the importance of meticulousness. By ensuring accuracy in your measurements before making a cut, you not only save time and resources but also enhance the precision and quality of your final product.
Choosing Your Medium: The Importance of Right Wood
Understanding the nature of various woods is pivotal to the success of your project. Delve into the characteristics of different types of wood, considering factors like the drying process they’ve undergone. Woods lose moisture and, subsequently, alter in size and form as they dry. Opting for kiln-dried lumber, which has been carefully dried to circumvent warping, is often a wise choice. Be cautious of using wood that hasn’t adequately dried, as it tends to distort and proves difficult to manipulate with machinery.
Moreover, while wood is a replenishable resource, sustainable sourcing remains a concern. It’s prudent to prefer materials known to be responsibly harvested, ensuring your project is not only of high quality but also environmentally considerate.
Vigilance over Imperfections
Attentiveness to the wood’s imperfections is crucial. Defects, whether structural or superficial, can compromise the integrity and appearance of your project. Equally important is the inspection for foreign materials like nails or staples, as these can wreak havoc on your woodworking tools.
Maintaining a Pristine Workspace
Incorporate regular cleaning into your woodworking routine. Employ a shop broom for sweeping away excess sawdust and complement this with periodic vacuuming using a shop vac. A tidy workspace isn’t just about organization; it’s a foundational aspect of workshop safety.
Honing Your Skills through Practical Application
Embrace practical projects to familiarize yourself with various woods, tools, and techniques. Engaging in hands-on activities, like constructing a bench hook, offers a valuable opportunity to refine basic skills in a real-world context. This simple tool is invaluable for stabilizing your work, particularly during intricate tasks. Initiating your journey with manageable yet fulfilling projects such as small tables or bookends can be incredibly rewarding and instructive.
Expanding Knowledge through Professional Guidance
Enrolling in local woodworking classes is an excellent strategy for broadening your skill set under professional supervision. This educational approach not only provides access to a fully equipped workspace, sparing you the expense of setting up your own, but also situates you in a community of peers with shared interests. Opportunities for such enrichment are plentiful, with venues like community woodshops offering an array of courses.
Prioritizing Safety in Woodworking
Vigilance in safety practices is non-negotiable. Comprehensive protective gear, including safety glasses, respirators, and hearing protection, is essential when operating equipment or handling particulate materials. Maintain a high level of focus, minimize distractions, and ensure your tools are in optimal condition for the safest and most efficient work environment. Sharp, well-maintained tools are easier to use, provide superior results, and reduce the risk of accidents.
Conclusion

Woodworking, an art form steeped in tradition, offers both seasoned artisans and newcomers a chance to create, innovate, and master a time-honored craft. For beginners, the journey into woodworking can be both exhilarating and overwhelming. The plethora of tools, techniques, and terminology may initially seem daunting. However, armed with the right tips and a dash of patience, novices can navigate the intricate world of woodworking with confidence. This blog has shed light on several DIY woodworking strategies, emphasizing simplicity, safety, and efficiency. These foundational tips pave the way for budding woodworkers to transform raw materials into finished masterpieces. As with any craft, the road to mastery is paved with practice, persistence, and continuous learning. So, as you pick up your tools and embark on this journey, remember that every expert was once a novice. Embrace the process, celebrate the small victories, and let the world of woodworking unveil its secrets to you, one project at a time.