Last Updated on October 16, 2023 by Pro Handyman Australia – Editorial Team
Drilling a hole in glass requires precision and a few essential steps. First, always use a carbide-tipped drill bit for best results. Second, to prevent overheating, maintain a continuous stream of water on the glass while drilling. This cools both the drill bit and the glass, ensuring a smooth operation. Below, we’ll delve deeper into the intricacies of drilling into glass, along with tips to ensure success.
Understanding Glass Drilling
Unlike drilling into wood or plastic, which most homeowners are familiar with, glass drilling presents unique challenges. The glass’s fragility and sensitivity to heat make it crucial to approach the task with caution. Drilling speed should be kept moderate to prevent sudden temperature rises, and users should be prepared for the drill bit to slide on the glass’s smooth surface initially.

Tips for Successful Glass Drilling
Water Stream: Always maintain a continuous flow of water on the glass. This could be done by having someone pour water during the drilling or by using a modified plastic jug for a steady water stream.
Use the Right Drill Bit: A carbide-tipped drill bit is recommended for glass drilling due to its effectiveness and durability.
To get the best results when piercing glass with a drill:
- Periodically empty the water to assess your drilling progress. Patience is a virtue in this endeavor. For instance, drilling a 1/4-inch hole in thicker glass materials, like a wine bottle, might take around 10 minutes. It’s crucial to reduce the drill’s forward pressure towards the end to prevent chipping the hole’s inner edge.
- Ensure the glass remains cool throughout the process.
- Using a steady stream of water, akin to the function of a wet tile saw, is preferable to compressed air for cooling purposes. The water also helps in containing the glass dust.
- Although curved glass can be drilled using a hand drill, employing a drill press simplifies the task.
- Always operate the drill at a slow pace. Rapid drilling, drastic temperature shifts, or a lack of support can result in breakages.
- Note that certain thinner glass types are more fragile when drilled and might break.
- Smaller objects can be drilled while submerged in water for added ease.
Safety First: Protecting Yourself

Glass drilling can pose certain hazards. It’s imperative to ensure your safety. Always wear protective eyewear, gloves, and a dust mask. This will shield your eyes from shards, protect your hands, and prevent the inhalation of glass dust, which can be harmful. Moreover, the continuous water flow aids in suppressing the dust and washing it away.
Gathering the Right Tools and Materials
To successfully drill into glass, ensure you have the following tools and materials at hand:
- Equipment & Tools: Cordless drill, gloves, protective eyewear, carbide drill bit, plumber’s putty, an empty plastic jug, a pushpin, and a clamp.
- Material: The glass you intend to drill into.
User Experience: Drilling into Glass
When it comes to drilling holes in glass, nothing beats first-hand accounts of what works best.

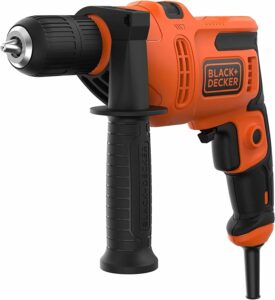
Sarah, a seasoned DIY enthusiast, shared her experience with the BLACK+DECKER 500W. She said, “I was initially skeptical, given the delicate nature of glass, but this drill exceeded my expectations. The smooth operation and consistent speed made the task seamless.”

Another user, Alex, vouched for the DEWALT ATOMIC 20V MAX. He mentioned, “Having used various drills over the years, the DEWALT ATOMIC 20V MAX’s precision stands out. Not once did I experience any cracking or undue stress on the glass.”
These hands-on experiences reiterate the importance of choosing the right tool for your project, emphasizing that the best hammer drill can make a significant difference in outcomes.
In-depth Hammer Drill Comparisons for Glass Projects
For those seeking a more detailed analysis, here’s a comparison of two top-tier hammer drills ideal for glass:
| Feature/Model | BLACK+DECKER 500W | DEWALT ATOMIC 20V MAX |
|---|---|---|
| Power (RPM) | 1500 | 1400 |
| Battery Life (Hours) | 5 | 4.5 |
| Price (USD) | $199 | $220 |
| Warranty (Years) | 3 | 2 |
| User Reviews (Out of 5) | 4.7 | 4.5 |
While the BLACK+DECKER 500W offers slightly more power and longer battery life, the DEWALT ATOMIC 20V MAX is also a strong contender, especially considering its precision. Your choice ultimately depends on your specific needs and budget.
Step-by-Step Guide to Drilling into Glass
- Prepare the Glass: Before starting, ensure that the glass is adequately padded, especially if you’re using clamps. When drilling flat glass, support from below is essential.
- Gentle Clamping: When securing the glass in place, remember to clamp it gently to prevent any breakage or damage.
- Setting Up a Water Barrier with Plumber’s Putty: Mold a 1-inch diameter ball of plumber’s putty into a strip approximately 1/4-inch wide and 3 inches long. Shape it into a circle and adhere it onto the glass.
- Establish a Water Flow: Fill a clean plastic jug with cool water and seal it. Near the bottom of the jug, make a tiny hole using a pushpin. For now, keep the pin inserted to stop water from leaking out.
- Position the Water Flow: Move your glass into the desired drilling position. Then, remove the pushpin, allowing a thin stream of water to flow. Ensure this stream hits the center of the plumber’s putty circle.
- Guide the Water Direction: Even though the water will fill up and overflow from the dam created by the putty, it’s beneficial to create a flow direction. You can do this by lightly pressing one side of the dam.
- Initiate Drilling: Insert your carbide drill bit into the cordless drill. Position the bit’s end on the intended drilling spot. Begin drilling slowly, ensuring the bit doesn’t stray from the intended spot.
Note: If starting the hole becomes a challenge, consider removing the putty dam temporarily and place a small square of cardboard on the glass. Drilling through the cardboard often helps stabilize the bit. Once done, reposition the dam and continue drilling.
Video on Drilling Hole in a Glass
Unlock the secrets to drilling holes in glass with precision and safety. In this video, we’ll guide you through a step-by-step process, highlighting the tools you’ll need, safety precautions, and pro tips to achieve flawless results. Whether it’s for a craft project or home repair, learn the art of drilling into glass without cracks or breakages. Dive in and master this invaluable skill today!
Preparation Guidelines
Understanding Speed: The velocity of your drilling process is paramount. Drilling into glass too briskly can produce excessive heat, potentially damaging the drill bit. Familiarize yourself with the variable speed settings on your drill. For example, a label indicating “0-1500 rpm” means that the maximum speed achievable is 1,500 rotations per minute. Mastering control over the drill’s speed based on the trigger’s pressure is essential for precise results.
Selecting Drill Bits: Invest in drill bits explicitly designed for hard surfaces like glass or tiles. These bits typically possess spear-shaped carbide or diamond tips. For starters, procure a smaller bit, roughly ⅛-3/32-inch, for initiating holes and subsequently, others depending on the size of holes you desire.
Lubrication Techniques: To mitigate heat and dust accumulation during drilling, dabbing a few drops of any oil onto the glass is advised. For vertical surfaces, use plumber’s putty or modeling clay to prevent the oil from dripping.
Safety Measures: Safety should never be compromised. Ensure the glass is stably positioned and doesn’t slide. For flat surfaces, a cushioned platform or rubber pad is ideal. Round objects like bottles should be clamped or secured in a vise. Furthermore, always equip yourself with protective gear when drilling.
Practice Runs: Prior to working on your main project, practicing on similar glass materials will provide a better understanding and improve technique. However, refrain from drilling tempered or safety glass as they’re constructed to break upon impact.
How to Differentiate Between Tempered and Annealed Glass

Distinguishing between these two is crucial for safety. Tempered glass typically has smooth, polished edges, whereas annealed or standard plate glass feels rough. Sunlight viewed through polarized glasses can reveal dark streaks in tempered glass. Minute imperfections are often visible upon close inspection of tempered glass. Additionally, scoring annealed glass results in a neat line, whereas tempered glass will exhibit flakes and bumps. Always check for any stamps or markers on a full sheet of glass indicating its tempered nature.
Conclusion
Achieving mastery in drilling through glass requires patience, practice, and adherence to safety guidelines. With the expertise from Perth Handyman Services, and by understanding the nuances of different glass types and the intricacies of the drilling process, one can ensure precise and damage-free results. Remember, preparation and knowledge are your best allies in this endeavor.
